Mastering Modern Ghillie Crafting: Wrapping Your Airsoft Sniper for Stealth in the Field
In the world of airsoft, blending seamlessly with your environment can make all the difference. Today, we’re going to dive into the art of wrapping your airsoft sniper using cutting-edge ghillie crafting techniques. I’ll guide you through each step, from preparing the materials to achieving the perfect finish. Let’s get started!
Materials Preparation

While you can source the materials individually, I’ve curated the essential components into the KMCS Winter Crafting Packs. These packs include everything you’ll need, from 3D leafs and camouflage material to my specialized KMCS Adaptive Ghillie Mesh, replicating natural green vegetation. Just remember, you’ll need to supply your own glue (Shoe Goo is recommended) and a pair of trusty scissors.
Step 1: Cutting the KMCS Woodland Floor Base Mesh

Begin by cutting the KMCS Woodland Floor Base Mesh to fit the contours of your sniper. This mesh forms the foundation of your ghillie wrap, the same material used in my KMCS Ghillie Suits for optimal effectiveness.
Step 2: Applying Glue and Mesh to the Scope

Apply a dab of glue strategically, ensuring not to obstruct any moving parts that adjust the scope. Gently place the base mesh over the scope and secure it using cable ties. Don’t fret about achieving a perfectly flat surface; ripples and imperfections will lend a more natural appearance.
Trim away excess mesh around areas that may require adjustment in-game, such as the zoom function.

Step 3: Wrapping the Barrel and Body

When wrapping the barrel and body, keep in mind future maintenance needs. Avoid covering joins or bolts, as you may need to disassemble the rifle later. If any mesh does accidentally obstruct these areas, don’t worry; a knife or scissors can rectify it post-setup, much like we did with the scope adjuster.
Maintain cleanliness around crucial in-game access points, such as the mag well and hop adjuster. For comfort and ease of use, keep the butt cheek clean and flat.
Step 4: Adding Depth with Paint

Utilize high-quality acrylic paint to add depth and realism. I prefer camo pens for their convenience, but any suitable acrylic paint will work. Apply it evenly, then take your sniper outdoors to assess the results. A well-executed Stage 1 will have your sniper looking impressively camouflaged.

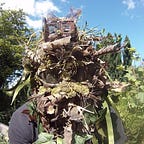
Stage 2: Adding Micro Cable Ties and Ghillie

Introduce micro cable ties (2.5mm, available in the KMCS Crafting Pack) to secure the ghillie elements. Start with laser-cut crafting leafs, pairing them together, securing them with a cable tie, and then separating them for a fuller appearance. Repeat this process with cotton leafs for added texture.
Next, work with the Adaptive Ghillie Mesh, a unique material that reacts to light much like natural vegetation. Combine two or three pieces, secure with a cable tie, and fluff them out for a lifelike effect.

Remember, the composition of leafs and Adaptive Ghillie Mesh depends on your specific operating environment. Trial and error will be your best guide.
Step 5: Introducing Raffia for Texture

To add depth and contrast, incorporate raffia, a specialized material from the KMCS Craft Packs. It’s meticulously colored and combed to mimic dead twigs. While you can find raffia in stores, you’ll quickly learn that dyeing, coloring, and thinning it can be a messy, time-consuming endeavor.
Final Touches and Conclusion

Ensure that your line of sight through the scope remains clear, and keep areas around moving parts free of excess leafs and raffia. With that, your craft is complete! If you’re interested in picking up a KMCS Crafting Pack, details can be found in the description and pinned comment.

Thank you for joining me on this ghillie crafting journey. Until next time, stay stealthy!